Tuesday, July 30, 2013

Free August Calendar for Your iWhatever


August is a little confusing for me. While I love Love LOVE the hot dry weather that the month usually brings, I still get a little sad that the beginning of August also means the new school year is about to begin. And while I always loved school, I must have loved summer more. 

 My Aunt Leesa loved for everything around her to be bright and full of color, so this calendar was made with her in mind. We lost her last week, but I know she is watching all of us and chanting, "Na-na-na-na-na, I'm in Heaven!" How can we be sad when she puts it that way?! 

If you need help getting this to your iWhatever or phone, click here. Or if you would like to learn how to make your own calendar page using the Coolibah app, click here. You can use the days and dates I made or find another online.


I don't have the desktop background ready yet, but I'll be back to add it in a few days.

Thanks for stopping by! See you next time!

Wednesday, July 17, 2013

Are You Tired of My "Upcycling" Yet?


I really hate that term. "Upcycling." I guess maybe it sounds too much like upchucking. ewww. I think we should rejuvenate or maybe reincarnate. Ooh--I like that!

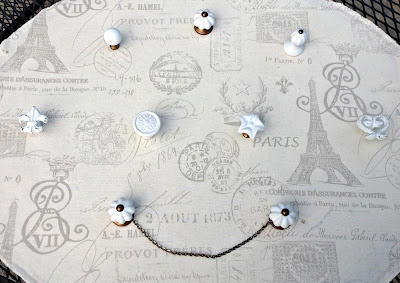
This is the story of how a sad and dated (and a little mildew-y) Home Interiors picture was reincarnated into a lovely jewelry display.

Better, huh?

Our story begins with a musty dusty old landscape that was acquired at auction. Sort of. (Long story for another day.) It also involves some chalk paint, fabric (leftovers from a trunk I "reincarnated"), and nine decorative pulls. These came from Hobby Lobby and were purchased at 50% off (of course!), averaging $1.50 each.


It's a very pretty picture, but there was some mildew on the mat and the shiny brass frame seemed to scream "1980's!" Don't get me wrong--I LOVED the 80's, but come on....


I took everything apart, discarded the mildewed picture, and set the glass aside. (I WILL come up with a use for it!) Hang on to the backer--we'll use it in just a second. In these Home Interiors pieces it is usually very sturdy. Kind of like a very thick chipboard that is screwed into the frame.

First I painted the frame with white chalk paint and brushed on just a bit of antiquing gel to bring out the design. Once the paint dried I put on a couple coats of wax and buffed it to a nice soft sheen.

I thought it would be easier to get everything lined up without the fabric in the way, so I placed several decorative drawer pulls on the backing and marked their positions. (Make sure you put the top at the top and the bottom at the bottom, or you might not be able to use the hanger.) Then I used my Crop-a-dile to punch holes for the pulls to go through.

I used spray adhesive to hold the fabric in place on this one, but I have since made more and used regular old glue. I like using the spray better, but the liquid worked just as well as long as it was spread thin.

I trimmed away the excess fabric, right up to the edge of the backer board, and punched the holes again, this time going through just the fabric.

 Then it was time to add the pulls! Between two of the knobs I attached a short piece of chain for hanging earrings. The picture above^ shows the front,


and this picture shows the back. A pair of bolt cutters would probably work very nicely on these bolts that need to be cut, but, alas, there are no bolt cutters to be found in my home or garage. So I used the Dremel instead. It's a small electric rotary tool. You know, ladies--like the one your manicurist uses on your acrylic nails! There is a flat round blade that works like a tiny little circular saw and cuts those babies right off. But be warned--there are a lot of sparks involved! 

All that was left was to re-attach the backer to the newly painted frame, and hang it on the wall!


I just love it! It sold so fast at AvaBelle's that Mom and I each made another, so now we have two in our booth! Stop in and check them out sometime if you're in the neighborhood!

Thanks for stopping by! See you next time!

Sunday, July 14, 2013

I Was Up-Cycling When Up-Cycling Wasn't Cool

At the end of the post for the July calendar, I added a photo of the small jungle garden in front of our house.


 When we bought our place almost 18 years ago (!) it had a huge sprawling evergreen and a very prickly holly bush under the front window. I despised that evergreen. My great aunt (the previous owner) used to pay me a penny for each bagworm I would pick off that thing. GAG! 

The evergreen became so overgrown that it had to be removed. Really--it would've caused structural problems. Honest. Once we pulled it out, roots and all, we were left with a rather large hole. Of course I couldn't stand to just fill it with dirt, so I found a claw foot tub (in the back yard) and an old oil can (also in the back yard. If you only knew!) and convinced Andy to dig out a little more so the tub would fit in the hole and we would have a wonderful little pond. 

The little garden has just kind of evolved since then. I have a lot of ajuga (I think that's how it's spelled) and vinca, some Japanese iris or flags, a painted fern, and some lily of the valley. Several years ago one of my aunts gave me some REAL water lilies. Native Missouri water lilies--not the wimpy kind you buy at Lowe's.  I tried several different water plants before Becky gave these to me, but nothing would carry over from year to year. These puppies are HARRR--DY!

When I finished posting the July calendar I went out to clean up a bit around the pond. The lily of the valley had really kicked in the last couple of years and kind of taken over the small space. I transplanted several clumps to a small hosta garden under a walnut tree in the back yard and took out what was left of a sad little azalea that just never took hold. I also had to work on (and by "work on" I really mean "beat on the porch floor repeatedly") the pump to get it to work again. Now all I need is a couple of bags of mulch to define the little path that goes behind the tub. 

 Doesn't it look better? It sounds great, too.


The front porch is just a few steps to the left, with a good old-fashioned porch rocker, some lush Boston ferns, a porch swing, and even some old motel chairs. I kind of like my place. Can you tell?
Where is your favorite place in your house? 

 Come back in a few days to check out another upcycling project. I'll show you how to turn an outdated frame into a shabby chic jewelry display.

Thanks for stopping by! See you next time!

Sunday, July 7, 2013

Baseball Baby!


I hope you were sitting down when you saw that I had a new post! Three posts in thirteen days?! Crazy!
I am between weddings now, so I'm actually getting close to being caught up with everything else. Well, not that close....

A friend's daughter is having a baby in the fall, so she asked if I could come up with a vintage baseball themed invitation for the baby shower. Being the mother in a baseball-loving family, I had several items on hand that would work very nicely. The best thing was the stamp set I got from Crafty Secrets online store. You know--the store for the Heartwarming Vintage blog--the site that has the linky party that I like to enter every month. So, anyway...I found this adorable little pitcher in the Play Ball stamp set: 
I scrolled through my hundreds of fonts (I'm sure you think that "hundreds" is an exaggeration. ha!) until I found one that reminded me of the lettering on a baseball jersey. I even had a font that makes the swooshes for underneath! Then I typed "You're Invited," printed it, and stamped my little boy above it. Easy peasy! 

I liked the idea of using a diamond shape for his background, but it needed that pop of red behind it. I layered both of those pieces on a blue rectangle and added it to the kraft base.
If she likes it, I will type the shower information on the computer and print it on the cardstock before I cut and fold the card bases.

My friend said she will need around a hundred invitations, so I wanted to keep it pretty simple. If I were using it for a birthday card or only needed a few invitations, I would probably have to add some ribbon or a strip of green or black paper across the bottom, but I love it just the way it is. 

Now I'm heading over to link it to the Heartwarming Vintage Linky Party!
Have a great week!

Thanks for stopping by! See you next time!