Friday, August 31, 2012

Free September Calendar (And It's Pretty, Too!)


Here is September's calendar for you to save to your phone/computer/iPod/iPad's homescreen or lockscreen so you always have a calendar handy. This month I went all out with the swirly-flourishy embellishments! I kind of like those. You probably wouldn't have guessed *wink* since I have them in one form or another on all but two of my calendars. Go to my April Calendar for help downloading this to your "iWhatever" or computer.

If you are not as crazy about flourishes as I am, here is the naked calendar so you can decorate your own. I use my iPad and the Coolibah app to make mine (click here to learn how) but you could use any scrapbooking or photo editing software. Finding a good calendar to start with is usually the hardest part, so I started making my own in a different program on my computer. However, I found this one (without letters and numbers) when I Googled "free calendar download" a few months ago. I had to add two weeks for September to fit, but I'm very pleased with the way it came out.


Yesterday I learned that when anyone tried to leave a comment here they got one of those annoying squiggly letter and number things that are impossible to read. I think I have taken care of that now and you should be able to comment without fear of being perplexed by a pesky puzzle. That being said, will someone please give it a try? Just say "hi" so I'll know it's fixed. 

I hope everyone has a lovely Labor Day weekend. Thanks for stopping by! See you next time! 

Friday, August 24, 2012

Are Paisleys A French Thing?


I can't believe it's been so long since my last post! I thought I was here last Friday, but it's been TWO WEEKS! Please allow me to apologize. Andy has been in Ireland all week so I've been extra busy and quite distracted. I don't sleep well when he is gone and by the time he gets home tonight, he will have been traveling for about 18 hours, so I'm turning the ringers off the cell phones and we are sleeping in tomorrow!

I had a goal of finishing this old foot locker while he was away. I found it at a neighbor's yard sale. Isn't it GORGEOUS?!


Oh, hold on a sec. Wrong picture....


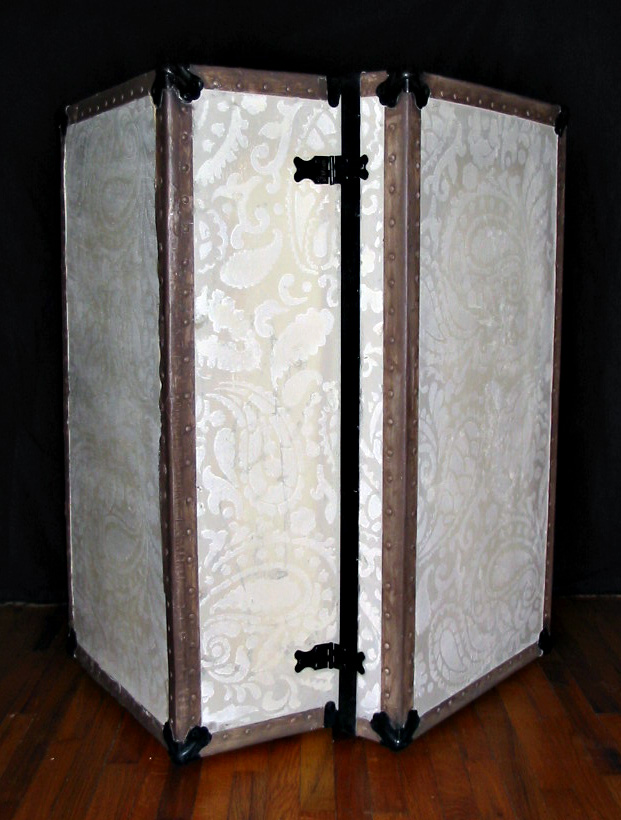
There! That's better! Now--isn't it GORGEOUS?! Keep reading to see the surprise inside! 

This piece was in horrible condition. It had been wet, so the bottom was very warped and rotted. I wouldn't have trusted it to hold up under any load at all, not that I would have put any of  my belongings in it--the inside was just plain NASTY! 


I cleaned it up as much as I could, then primed and painted it, inside and out. I used a satin spray paint in Almond then sprayed lightly around the edges in Pebble. The surface was still scarred and rough in places, so I didn't even bother trying to make the paint all nice and smooth. 

Of course, I had to "Paisley-fy" it. As soon as I saw that big paisley stencil I knew I wanted to use it on this trunk. (At my house these days, anything that doesn't run away gets painted or covered in fabric. Andy's going to pull in to the garage one day to find me painting tire tracks on his giant toolbox and lining the drawers with denim!) The pattern helps to hide some of the scratches on the surface. I used a creamy white to keep it subtle, then painted the trim. Brown for the "leather" and black for the metal pieces. 

Since I didn't trust the bottom I decided to stand it on end like some of the really big steamer trunks you see. I guess it was intended to stand up, because there is only a handle on the one end and the front. 
I glued a very thin piece of plywood to the bottom and painted it to match the top and sides.


Here is a look at the back side. No one would ever guess how awful it looked a few weeks ago!

To fix up the inside, I covered an old election sign with this great cotton duck I found at Hancock's and glued the sign to the bottom. It's the perfect fabric to go inside a trunk.


I covered another election sign with batting, wrapped it in the awesome fabric, criss-crossed it with black grossgrain ribbon, and added some antique-ish brads where the ribbon intersects. Voila! A French bulletin board! (I honestly did not make the connection between the French bulletin board and the French designs on the fabric until I had it all put together.) Is there any chance that paisleys are a French thing, too? 
The hardest part of the whole project was finding the right piece of wood for the shelves. I figured out how to mount them, but none of the scrap pieces I had looked right. I considered glass, but after two bad cuts (of the glass, not me!) I gave up. I know I could have taken the glass to "the glass place" to be cut, but it was after hours and I wanted this DONE! 
I rummaged around a bit more and found an old potting shelf that was PERFECT! I cut the boards to size and covered the front edge with a piece of wood trim.

Okay. You've been very patient. You can see the inside now.... 


I absolutely love it! I really hate to sell it, but it is headed to our booth at Uncle Doc's to wait for someone else to fall in love with it. I can just see it with books and travel souvenirs on the shelves, and postcards and photos tucked into the ribbon. It's also a good size for DVD's or any number of crafting items. *wink*

I had so much fun with this! Most likely because it was such a challenge.  I love it when I can rescue something that most people would throw out. I have another footlocker and a trunk in the garage, but the footlocker is Dad's, and somehow I don't think he would appreciate the paisleys! 

It's time for me to go get my Hubby! Thanks for stopping by! See you next time!
Michele 

Friday, August 10, 2012

Stamp Club Sneak Peek


One Friday each month several of us meet at our friendly Stampin' Up! demonstrator's home for "Stamp Club.". Sherry has held these gatherings for so many years that I can't remember when we started, but the oldest Idea Book on my shelf is from 2005. This month we will be trying something new. Sherry has invited me to design the projects and lead the group! I've come up with two card designs and thought you might like to see them.


I started with Baja Breeze, but any color of the rainbow would work for your base. The front is embossed with a Cuttlebug folder called Rebecca. I cut and embossed three shapes from Whisper White cardstock. The largest is from the Labels Collection Framelits and is embossed with the Perfect Polka Dots folder. On top of that are two shapes from the Apothecary Accents Framelits, one embossed with the Elegant Lines folder, and the other stamped with whatever image or sentiment you like and adhered with dimensional adhesive. All edges are inked with Soft Suede. This card is very easy to make--it just requires a lot of cranks on your Cuttlebug or BigShot. Just think about all the different looks you could get simply by changing dies or embossing folders! 


 This is probably my favorite way to make a card in a hurry. I cut a piece of vellum cardstock 4x5.25 inches, stamped it with the En Francais background stamp in Soft Suede, and inked the edges. Next I used Elegant Eggplant to stamp the Sweet Floral image over En Francais. The vellum doesn't absorb the ink very well, so to avoid smears I held the heat gun on the images for a few seconds. Then I added a piece of Very Vanilla seam binding ribbon and adhered the vellum to a card of Perfect Plum. (Apply your adhesive so that it will be hidden by the ribbon and the stamped image if you use vellum.) I didn't put any type of sentiment on this card, but I think it would look nice with an oval tag tied to the ribbon, don't you? This design works with so many stamp combinations. Just choose one image that has a fairly small pattern and one bigger, more substantial image. Quick and easy! 
Here is the same card using cardstock instead of vellum. The images look very different even though the inks are all the same:

I got all my fair entries (and ribbons!) back safe and sound, so I'll try to snap some pictures over the weekend. Maybe something you see will inspire you to dig those boxes and boxes of photos in your closet!

I better go make sure everything is ready to go--tonight's the night! I'll see some of you at Sherry's!
Thanks for stopping by! See you next time!
Michele