I really hate that term. "Upcycling." I guess maybe it sounds too much like upchucking. ewww. I think we should rejuvenate or maybe reincarnate. Ooh--I like that!
This is the story of how a sad and dated (and a little mildew-y) Home Interiors picture was reincarnated into a lovely jewelry display.
Better, huh?
Our story begins with a musty dusty old landscape that was acquired at auction. Sort of. (Long story for another day.) It also involves some chalk paint, fabric (leftovers from a trunk I "reincarnated"), and nine decorative pulls. These came from Hobby Lobby and were purchased at 50% off (of course!), averaging $1.50 each.
It's a very pretty picture, but there was some mildew on the mat and the shiny brass frame seemed to scream "1980's!" Don't get me wrong--I LOVED the 80's, but come on....
I took everything apart, discarded the mildewed picture, and set the glass aside. (I WILL come up with a use for it!) Hang on to the backer--we'll use it in just a second. In these Home Interiors pieces it is usually very sturdy. Kind of like a very thick chipboard that is screwed into the frame.
First I painted the frame with white chalk paint and brushed on just a bit of antiquing gel to bring out the design. Once the paint dried I put on a couple coats of wax and buffed it to a nice soft sheen.
I thought it would be easier to get everything lined up without the fabric in the way, so I placed several decorative drawer pulls on the backing and marked their positions. (Make sure you put the top at the top and the bottom at the bottom, or you might not be able to use the hanger.) Then I used my Crop-a-dile to punch holes for the pulls to go through.
I used spray adhesive to hold the fabric in place on this one, but I have since made more and used regular old glue. I like using the spray better, but the liquid worked just as well as long as it was spread thin.
I trimmed away the excess fabric, right up to the edge of the backer board, and punched the holes again, this time going through just the fabric.
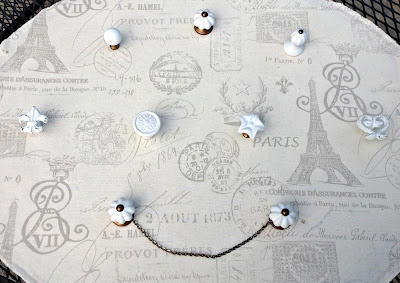
Then it was time to add the pulls! Between two of the knobs I attached a short piece of chain for hanging earrings. The picture above^ shows the front,
and this picture shows the back. A pair of bolt cutters would probably work very nicely on these bolts that need to be cut, but, alas, there are no bolt cutters to be found in my home or garage. So I used the Dremel instead. It's a small electric rotary tool. You know, ladies--like the one your manicurist uses on your acrylic nails! There is a flat round blade that works like a tiny little circular saw and cuts those babies right off. But be warned--there are a lot of sparks involved!
All that was left was to re-attach the backer to the newly painted frame, and hang it on the wall!
I just love it! It sold so fast at AvaBelle's that Mom and I each made another, so now we have two in our booth! Stop in and check them out sometime if you're in the neighborhood!
Thanks for stopping by! See you next time!


No comments:
Post a Comment