So.... I completed all of my experimentation with my supplies I showed you the other day. And I really like how my project turned out. BUT I learned a few things. I would be happy to share them with you so you can learn from my experience.
1. Dry corn husks will absorb color better if you soak them in water first. (You never know when that one might come in handy!)
2. All those tiny little fibers that come off a piece of burlap are a real bear to get out of sweat pants.
3. Dry mimosa seed pods do not bend. No way, no how.
4. Mod Podge is awesome, but sometimes you just have to plug in the old hot glue gun.
5. When you're on vacation in the tropics and you see a really cool book made with all kinds of interesting fibers and plant parts, BUY IT! It's well worth the ten or twelve bucks to get that look!
That being said, here are the highlights of what I did:

I soaked the dry corn husks ("upcycled" from the tamales I had for lunch!) in a jar of water until they were soft, then patted them dry. Then I poured a little of my homemade walnut ink in a saucer and soaked the husks in that for a few minutes. (see Lesson #1) When I was tired of waiting I moved the husks to dry on some paper towels. Be careful where you put them--that walnut ink stains!

While those were drying I crumpled up the tissue paper and used the Stampin Up! Always Artichoke to ink it all over. I wanted the look of leaves and the green paper was too bright. I also inked some tan tissue paper, so I came out with two different shades of green that would pass for the colors of tropical leaves.

I spread Mod Podge on a narrow strip of chipboard (2 1/2 x 8 3/4 inches) and laid out pieces of embroidery floss in kind of a fan pattern to resemble the veins on leaves. Then I added a little more Mod Podge and put pieces of tissue paper on top, finishing with another coat of Mod Podge. The MP is still milky in this pic, but can you see the "leaves?"


Next I used gobs (yes, THAT word again!) of Mod Podge to adhere burlap to two pieces of 8 1/2 x 11 chipboard for the front and back covers. I put burlap on the inside and outside of each piece of chipboard. The burlap is soooo messy (see Lesson #2), but a thick layer of MP cuts down on all those stray fibers. I even used a brayer to make sure it was good and secure. I put a coat of MP on top of the front cover, but it really didn't need it.
I adhered the strip with the "leaves" to the burlap-covered chipboard with...you guessed it...Mod Podge! Then I used my high tech multi-purpose tool (aka, felt-wrapped brick) to clamp the pieces together while the MP set up. You would be amazed with the things that brick can do! It's an excellent door stop, a very efficient aluminum can smasher, a take-anywhere vise, and Kit says it gives great back rubs (you probably can't see all the cat hair that I was unable to remove).
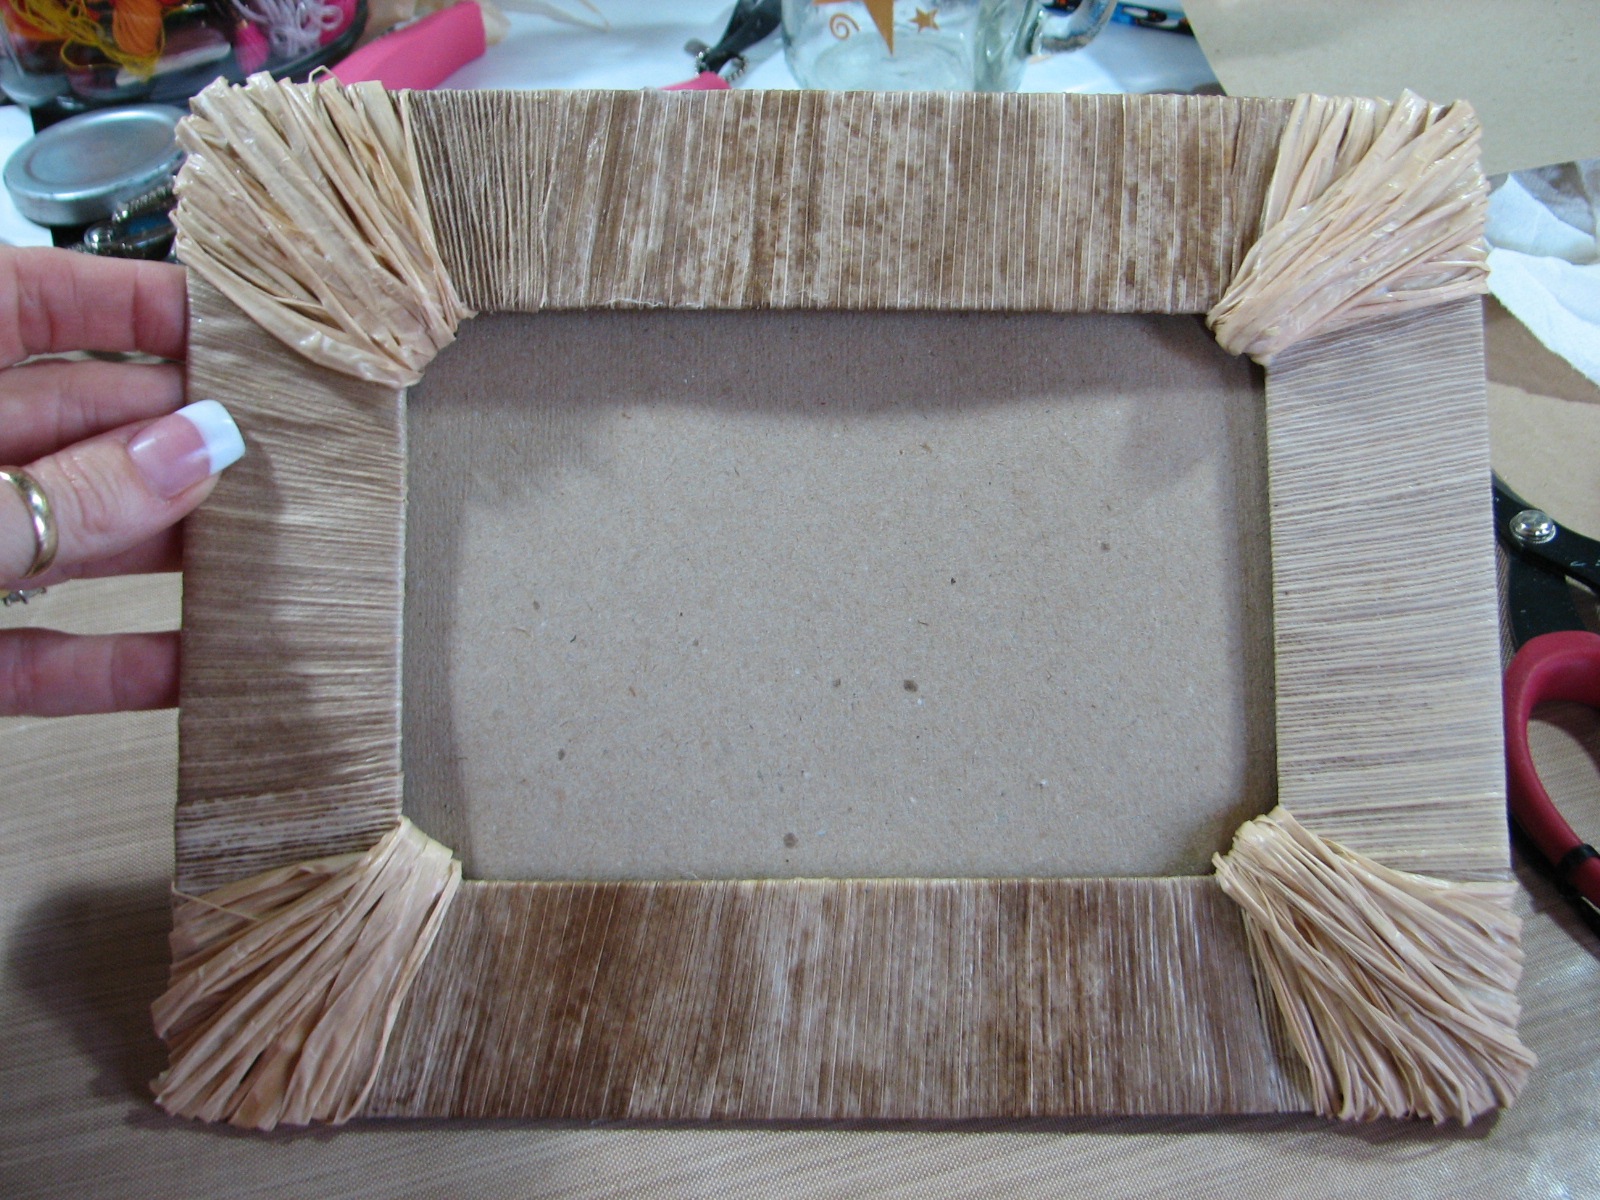
While all that Mod Podge was drying I went to work on a frame for the front cover. I cut the size I wanted from chipboard and wrapped it with the corn husks. Then I used raffia to wrap the corners. Corners are always so messy! I like to cover them with something pretty or interesting whenever I can! I adhered chipboard strips (spacers) to the back of the frame so there is room to slide a picture in and out then I put a piece of kraft paper behind the strips so it would all be easier to attach to the cover. Yeah, right....
Once everything was secure I brushed on a layer of Mod Podge to hold everything in place and bring out the colors a little. The mimosa seed pods got a coat of MP, too, before I glued them to a piece of kraft paper and cut them into triangles to put on the front cover. These aren't permanently adhered yet. I want to try soaking some in water to see if they will soften enough to wrap them around the corners (see Lesson #3), but that is for another day.

For pages I just used kraft paper cut to 8 x 12. I punched two holes thru the pages and the left edge of the covers. I threaded a long piece of hemp up through the top hole, wrapped the hemp around a stick, and took it back down through the same hole. Then I took the same piece of hemp up through the bottom hole, around the stick, and back down. I pulled both ends tight and tied a good knot at the back. If you want to try this on something but can't decipher these instructions, leave me a message or send an email and I'll add pictures.
The little bottle of sand is also upcycled. It's a Tabasco bottle -- like you get with room service -- with a tiny little cork from the hardware store. (Eat your heart out, Tim Holtz!) I brushed some glue around the top and wrapped hemp around it, leaving enough to tie it to the stick. That cute little shell has a hole in it and was just begging to be hung like a charm.This is where I had to break out the hot glue gun (see Lesson #4). The frame was too bulky and Mod Podge just wasn't going to cut it. A good glob-o-glue in each corner worked great! I also used the hot glue to attach the little shells to the bottom right corner of the frame.
These are three of the books that served as inspiration for my Mexico book. All I had was my phone's camera but they're clear enough to remind me of how the books were made.


(That brought on a Flashback)
When I was growing up Mom made a lot of our clothes. I remember when we were shopping, she'd see something she liked and say, "I can make that for so much less!" Then we'd go look through patterns and find something similar, along with a nice piece of fabric. I guess I have just transferred that to scrapbooking, because I catch myself saying that ALL THE TIME! Thanks, Mom! That makes it more fun.
(End of Flashback)
All of the green on each book is leaves and the brown is seed pods.They really were only ten or twelve dollars (see Lesson #5), but they were odd sizes and I didn't know how well they were put together or if the pages in them were photo-safe. I thought about buying one, taking it apart, and attaching the front to the cover of another scrapbook. That probably would have worked, but I'm very happy with the way mine turned out.
I forgot the wood veneer again. Rats! I'm going to cut the word "Mexico" from a thin sheet of wood veneer that's still hiding in my closet and attach it to the bottom of the frame. This book will be for photos from the two times Andy and I have been to Mexico, and the trips the boys made with their Uncle Brian. So now I just need to print those pics. And clean my table again. Ugh!
Thanks so much for stopping by! See you Friday!
You did a GREAT job. That was a big project and it is so much more special because you made it as opposed to buying it ready made. You NEED to do a YouTube video about this project. Immediately!
ReplyDeleteHi I am Tina Morgan and I am Annes Granddaughter in law. She sent me your blog and wanted us to get in touch. I am a Scentsy Consultant and she wanted me to send you a catalog. I am not sure if you are familiar w Scentsy, but they are wick less candles that are non-fire hazard, flame less, no soot, and kid friendly. Because they are decorative Warmers that melt over 83+ smells of wax they will not burn a kid or person of they touch it. They operate via lightbulb and plugin to the wall. They are absolutely amazing! She'd thought you'd like them. You can go to my website to see what they are all about. www.tinamorgan.scentsy.us All of my contact info is out there if you have questions. Also have you heard of Pinterest? You can post your ideas out there as well.
ReplyDelete