Showing posts with label Furniture. Show all posts

Friday, November 15, 2013

Welcome to the New and Improved Ava Belle's!


The flea market in downtown Aurora where Mom and I have a booth is moving        a-l-l      the       w-a-y    a-c-r-o-s-s      the      s-t-r-e-e-t!  Ok, actually it's across two streets and three doors down, but I like to play with words, so just go along with it, alright? 
It's been so much fun loading the new booth with tons of merchandise and making sure everything is arranged just right! This booth is smaller than the spot we had at the old building, but we managed to fit MORE stuff in it! 


We have lots of scrapbooking supplies,


several pretty lamps (including one made from an old hanging wire planter), 


a wall full of Christmas decorations (and then some!)


and lots of other pretties!


We even have stuff hanging overhead and on the backside of the hand-painted armoire (which is for sale) and our rescued display shelves!
We open to customers Monday. Peggy (Ava and Isabella's Gigi) has done an amazing job getting the building ready for us. Everything looks wonderful! If you're ever in Aurora Missouri stop by and leave us a message on that big chalkboard! 


Tuesday, April 16, 2013

Chalk Paint Paisleys (and a Chair!)


Good evening! Sometimes I come up with a quippy little title for a post and that makes me very proud. Other times I pretty much punt. ^ Oh, well. It covers all the important stuff!  :)

The home decorating and DIY blogs are full of posts about chalk paint, and you can't avoid all the chalk-paint-painted furniture ideas on Pinterest. (Not that you would want to!) Nevertheless, Yours Truly had never so much as dipped a brush into a reclaimed margarine tub of the stuff. Not being one to miss any opportunity to make a mess (just ask my mom or my husband), I felt compelled to give it a go. 

I understand that there are some lovely brands of chalk paint on the market. They come in a wide range of  colors and go on very smoothly. But I was planning to paint a chair that took a detour on its way to the burn pile, so I didn't want to pay the rather high price for one of those colors. I did a good bit of reading online and found several variations on basically the same three recipes. One uses Plaster of Paris (POP), another uses non-sanded grout, and the third uses calcium carbonate powder. I went with the POP because I'm cheap frugal. 

I've mentioned before that I'm not really one for recipes. But I thought it might be a good idea to use other peoples' experience to my advantage. I went with a three-to-one ratio of paint to POP, with enough water to dissolve the plaster powder. In a reclaimed margarine tub (You thought I was joking, didn't you?!) I mixed a little water into the POP. Once it was nice and smooth and about as thick as pancake batter, I added the paint. I used a flat white that I kind of splurged on. I was shocked at how little odor that paint had. 

I used a cheapy disposable brush and slapped on a couple coats of white, then added a few drops of acrylic to tint most of the paint that was left, saving just a little white for the stenciling. I wish I had taken pics, but it was just an experiment. I didn't expect to blog about it!

I painted the seat, the strip across the top, and the...uhh...flat piece in the middle of the back(?) with the blue. Honestly, I only left the legs and the spindles white because I wanted to get to the paisleys and it takes a long time to paint around all those spindles. Then I got to break out the stencil!

After all the paisleys were painted, I scuffed everything up a bit with sandpaper. I tried to keep it to the areas that would have worn over the years, like the tops of the stretcher where your feet rub, or where you'd grab the top to pull the chair away from the table.

Next I mixed a little stain with some good old fashioned furniture wax. I think I've had that can in my utility room cabinet for 15 years! I'm sure it was happy to be put to use. The stain was a very red shade, so the white paint looked very pink until I buffed it. I learned that if the wax sets up too thick (in this case, too pink!), you can rub in a little fresh wax and it softens so you can remove a little. Nifty!

Ok. You saw the seat up above. That pic is now the homescreen on my iPad. Here is the rest of the chair:


And another angle....


It will soon have a spot at our booth at Ava Belle's Flea Market in lovely downtown Aurora, Missouri. Hopefully someone will adopt it and give it a loving home. I see it in a nursery. 

Now that I'm on the chalk paint bandwagon, don't be surprised to see more painted furniture, and yes, most likely more paisleys!  ;)

Thanks for stopping by! See you next time!

Thursday, February 7, 2013

From Waterbed Drawer to Shabby Chic Shelf!


Time to "upcycle" again! This shelf/bulletin board used to be a drawer under a waterbed. Really! Isn't it adorable? I think this one is going to go live with a young lady I know, but there are five more drawers in my garage, lots of fabric in my scrap room, and still about 40 election signs waiting for their chance to live a purposeful life!

Let me show you what I did. Even if you don't have any old drawers lying around, or you don't have any interest in making a bulletin board shelf, maybe something I do will trigger a different idea for you. 

I started with the drawer, some acrylic paints, fabric, quilt batting, ribbon, some brads that very conveniently resemble upholstery tacks, the hot glue gun, and an election sign.

Maybe you remember what waterbed drawers look like. Pretty plain. Very 80's. I slopped on some nearly neon green acrylic paint, added a layer of crackle medium, and topped it off with a little white here, a little cream there, all kind of smooshed together. This is definitely NOT a project where neatness counts. 


The whole point of using something like a crackle medium is to make the piece look used and worn, and old paint doesn't crack evenly across the entire surface. Some areas will be smooth while some will have tiny checks and others will have huge cracks. So don't stress out trying to make it look "perfect!"
I sanded a little around the edges of the drawer where paint would naturally wear away then used some old acrylic antiquing gel that I watered down a bit and swiped across the surface just to bring out the cracks and bare wood a little more.

Now on to the inside....


I cut the sign just a bit smaller than the inside of the drawer and covered it with quilt batting, using hot glue to secure the edges.


Next, I wrapped the fabric over the batting, pulled it snug, and hot glued the edges. I divided the left and right sides into halves and the top and bottom into thirds to determine where to start and end the ribbon. 
The back of this will never show, so don't worry about mitering corners or making the edges even. You can even leave all the hot glue stringies all over the back!


These brads were all different colors when I started. I pushed them into a piece of foam and brushed on a coat of Vintage White acrylic paint. 


When that dried, I very lightly brushed the tops and edges with some shimmery pink puff paint. That's what I had on hand. I love to wear pink, but to be honest, with two boys, I've never had a lot of use for pink paint of any kind!


I pierced a hole through all the layers at each ribbon intersection and pushed the brads through. Then I squirted some hot glue on the back of the sign and pushed it down to the bottom of the drawer. With all the fabric and batting it was pretty snug. Now it's ready to load.


There you go! It can hang on the wall or sit just about anywhere. 
I can't wait to see my friend's reaction! Then I'll have to get busy and put together a few more to sell at the flea market!
So.... Did inspiration pay a visit? What did it say?
Thanks for stopping by! See you next time!

Saturday, October 27, 2012

"Pa-Rum-Pa-Pum-Pum"


They say everyone marches to the beat of their own drum. If that is indeed the case, ^this is my kind of drum! It's a drum, it's a lamp, it's a coffee table! It can't decide on just one thing to be, so it's all three. Sounds like a perfect metaphor for my personality. lol 
We had this old bass drum for the kids to play with when I taught preschool at Honeytree. When we decided it was time to close our doors, of course the drum had to come home with me. I knew that someday I would be inspired to do something really cool with it. So for almost five years, it has collected dust and spiders in my garage. When I pulled it out, it looked like this:


I don't know when or where it lost its other head, but I only needed one to make our table. I cut a circle from a piece of plywood and secured it inside the top edge with a few screws.


I used some scrap 2x2's to mount four wood fence post toppers inside the bottom. I'm skipping over that part because it was kind of complicated and I don't have pics to help with the explanation. If you reeeeally want to know how I did it, leave a comment asking about it and I'll get back to you. I attached a light socket to the 2x2's and painted everything black. Once the paint dried I put the head back on and plugged it in. 


In Aurora, band doesn't begin until sixth grade, but my son Michael has been a percussionist at heart since he started going to early morning practice and spending time around marching band kids with me when he was three years old. He now shares a townhouse with two classmates who were in the drumline with him. I couldn't have asked for a more perfect home for this!  


I have a whole TOWER of drums in my garage now,
just waiting to be made into something cool. I see 
another coffee table, an end table, and maybe even 
a couple of hanging lights! Of course I'll let you know 
how they turn out.

One more band-related item....
It's time for the Aurora Bands' annual Halloween Carnival and Chili Supper. The bands have hosted these festivities since the 1920's! Mom and I have cooked the chili and some scrumptious beef barley soup for the past 7 or 8 years, but this year I passed the ladle on to those who still have children in band. Since I didn't have to do all that shopping, chopping, and stirring, I painted a sign! One of the boys brought me a four foot by eight foot sheet of plywood. That's a BIG sign!


Now I'm ready for my chili!

Thanks for stopping by! See you next time....


Friday, August 24, 2012

Are Paisleys A French Thing?


I can't believe it's been so long since my last post! I thought I was here last Friday, but it's been TWO WEEKS! Please allow me to apologize. Andy has been in Ireland all week so I've been extra busy and quite distracted. I don't sleep well when he is gone and by the time he gets home tonight, he will have been traveling for about 18 hours, so I'm turning the ringers off the cell phones and we are sleeping in tomorrow!

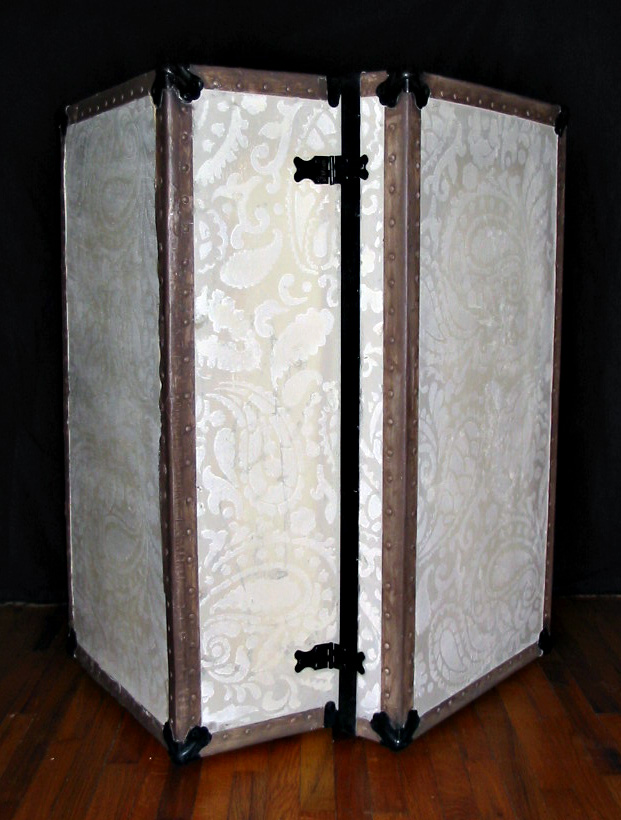
I had a goal of finishing this old foot locker while he was away. I found it at a neighbor's yard sale. Isn't it GORGEOUS?!


Oh, hold on a sec. Wrong picture....


There! That's better! Now--isn't it GORGEOUS?! Keep reading to see the surprise inside! 

This piece was in horrible condition. It had been wet, so the bottom was very warped and rotted. I wouldn't have trusted it to hold up under any load at all, not that I would have put any of  my belongings in it--the inside was just plain NASTY! 


I cleaned it up as much as I could, then primed and painted it, inside and out. I used a satin spray paint in Almond then sprayed lightly around the edges in Pebble. The surface was still scarred and rough in places, so I didn't even bother trying to make the paint all nice and smooth. 

Of course, I had to "Paisley-fy" it. As soon as I saw that big paisley stencil I knew I wanted to use it on this trunk. (At my house these days, anything that doesn't run away gets painted or covered in fabric. Andy's going to pull in to the garage one day to find me painting tire tracks on his giant toolbox and lining the drawers with denim!) The pattern helps to hide some of the scratches on the surface. I used a creamy white to keep it subtle, then painted the trim. Brown for the "leather" and black for the metal pieces. 

Since I didn't trust the bottom I decided to stand it on end like some of the really big steamer trunks you see. I guess it was intended to stand up, because there is only a handle on the one end and the front. 
I glued a very thin piece of plywood to the bottom and painted it to match the top and sides.


Here is a look at the back side. No one would ever guess how awful it looked a few weeks ago!

To fix up the inside, I covered an old election sign with this great cotton duck I found at Hancock's and glued the sign to the bottom. It's the perfect fabric to go inside a trunk.


I covered another election sign with batting, wrapped it in the awesome fabric, criss-crossed it with black grossgrain ribbon, and added some antique-ish brads where the ribbon intersects. Voila! A French bulletin board! (I honestly did not make the connection between the French bulletin board and the French designs on the fabric until I had it all put together.) Is there any chance that paisleys are a French thing, too? 
The hardest part of the whole project was finding the right piece of wood for the shelves. I figured out how to mount them, but none of the scrap pieces I had looked right. I considered glass, but after two bad cuts (of the glass, not me!) I gave up. I know I could have taken the glass to "the glass place" to be cut, but it was after hours and I wanted this DONE! 
I rummaged around a bit more and found an old potting shelf that was PERFECT! I cut the boards to size and covered the front edge with a piece of wood trim.

Okay. You've been very patient. You can see the inside now.... 


I absolutely love it! I really hate to sell it, but it is headed to our booth at Uncle Doc's to wait for someone else to fall in love with it. I can just see it with books and travel souvenirs on the shelves, and postcards and photos tucked into the ribbon. It's also a good size for DVD's or any number of crafting items. *wink*

I had so much fun with this! Most likely because it was such a challenge.  I love it when I can rescue something that most people would throw out. I have another footlocker and a trunk in the garage, but the footlocker is Dad's, and somehow I don't think he would appreciate the paisleys! 

It's time for me to go get my Hubby! Thanks for stopping by! See you next time!
Michele 

Sunday, July 15, 2012

More Awesome Paisley Stenciled Tables.


While surfing for inspiration (browsing blogs and other websites) a few weeks ago, I happened upon a blog called Domestic Imperfection and some pictures of a table with a paisley design stenciled across the top. You can see Ashley's post HERE. Go ahead and look. I'll wait....
Isn't that just beautiful?!
A few days later I was at Uncle Doc's, the flea market where Mom and I share a booth, when I spotted two plain little end tables that Doc had purchased just a few minutes before I walked in. 


They were practically screaming my name! I made a deal with Doc: If he would trust me with those two tables, I would take them home and do my thing, and when he got them back he could put a better price on them. (I was just dying to stencil paisleys on something and they were perfect!) Doc agreed, thinking I had more than one screw loose, and helped me carry the tables to my car. 
I sanded the tops a bit, glued some loose joints, and tightened some screws (on the tables-not in my head!). Then the stencils I had ordered from Cutting Edge Stencils arrived and the real fun began. 
 I taped the stencil in place with blue painters' tape and used a four inch foam roller to apply creamy white acrylic paint. The stencil pattern is almost two feet square, so that part was done in no time! After the acrylic paint dried I gave them a light sanding and, using a foam roller again, rolled on a couple layers of Minwax Polyshades, which is a stain and polyurethane combination. You could use straight polyurethane, but I wanted to tone down the contrast a little. (Besides--Ashley used stain over the paint on her table. If I'm going to use someone else's idea I should do it correctly, right?) I painted the skirt of the tables and the legs with a white latex paint then brushed some of the Polyshades over those areas as well, purposely leaving it a little streaky and toning down the contrast again. Finally, I replaced the knobs on the drawers. One was pretty wonky anyway, and I found some that looked like crazed ceramic at Hobby Lobby (for half price, of course!) They are perfect! Here are some after photos: 


I am happy to say that Doc was very pleased with the way they turned out. I am too! I have an old footlocker I'd like to doll up a bit next, so I'll let you know how that goes. 
Before I can jump into that, however, I have a bass drum table/light to show you and a few scrapbooking projects to take to the fair. Yes, the fair. Stop laughing.
I'll be spending a big chunk of the next three weeks with the color guard girls, learning drill for the upcoming marching season. Geez. Guess I better go get some laundry done! 
Thanks for stopping by! See you next time! 
Michele

Tuesday, June 19, 2012

It Just Looks Like I Live Deep In The South


How inviting is this?! Relaxing on a shady porch in a rocker with a glass of iced tea and a good book (on an iWhatever).
Our favorite part of our house is the front porch. Even when the floor needs to be painted. It's just six feet deep, but it runs about 26 feet across the front of the house and another 30 feet down the south side. It's very welcoming and the shade from the roof helps keep the downstairs cool if there is any kind of breeze at all. The porch is the one thing that we both insisted on when we were adding to and renovating the original house, and it is the house's most outstanding feature.
But I'm not here to write about my porch today. I'm here to write about that little table in the photo. I know that's not my normal kind of thing, but it was so much fun to re-do! It is literally a marble top table! I found it at a neighbor's garage sale and bought it for one dollar. Yep. One. Of course it looked more like this at that time....


I think it was meant to be a plant stand. I'm not a big fan of that shade of green paint, so of course I had to cover that. I had just enough blue left from when I painted the rocker a couple years ago. I didn't want it to look new. That would make it stick out like a sore thumb at my house! So I left a few spots bare and sanded a little to let just a hint of the green come through. I have some big pieces of glass in my backyard (my uncle was the original American Picker) and a few months ago I learned how to use a glass cutter. I knew I wanted to put glass in the top and bottom of this, but I couldn't decide what to do to make it cute.
Then I remembered all those flat marbles that I used to put in vases and candle dishes. I had enough different colored ones to make a design in the top, and the bottom is just rows of green. (No problem with green glass or glasswares--I absolutely love Jadite--it's just that shade of paint. It's a home town rivalry thing.) 
I just put down a dab of hot glue and pressed a marble into place. The worst part was trying to clean up all the hot glue "stringies!"
I had to squirt some glue in the joints and pound in some loose nails to tighten it up a bit, too. I'd hate to spend an hour and a half gluing down all those marbles and have the whole thing collapse under the weight!


If you wanted to do something like this, the hardest part would be finding the right piece to start with. 

I took this pic from above so you could see the pattern. When the photo opened on my computer, my first thought was, "Wow! That would make a great patterned paper!" It would make a neat background for an iWhatever, too. If you use digital papers and would like a copy, just send me a message and I'll remove the watermark for you. 


That's it for now. I'll try to get back Friday, but you know what a wonderful job I've done of that lately! lol
Thanks for stopping by! See you next time!